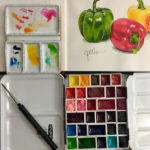
I put all my new paint onto swatch cards so I can compare colors between brands.
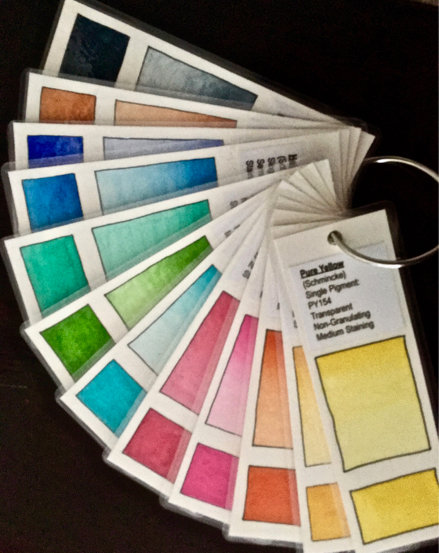 Swatch cards also allow you to compare your stash with other colors you’re jonesing to purchase! These swatches help you to stop duplication of colors. Who wants to waste money buying paint you won’t be using for a year? I don’t. I hate coming home only to find I’ve chosen a color I have in the bottom of my stash. That used to happen a lot in the beginning. Now I do a ton of comparing until I know it’s a color I really will need.
Swatching your watercolors also keeps the pigment information easily accessible. I find learning pigment information one of the best ways to understand my paint, other than actually just painting with it, lol. Learn all about pigment information and why it’s important here.
Here’s how I make a swatch card:
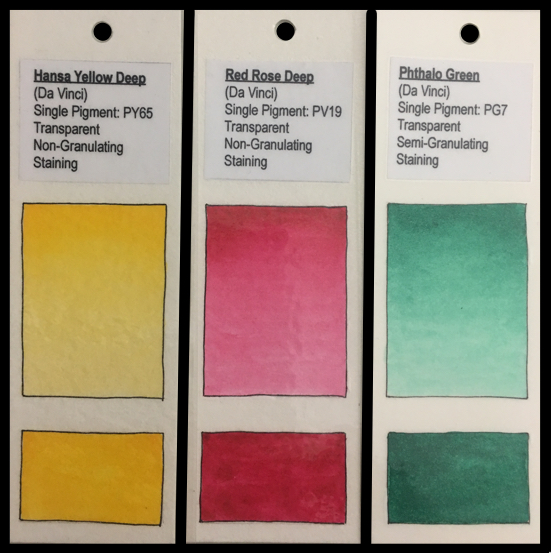
I compiled all the information on every paint tube and pan I own. Then I opened a document and put all the information down in the following format (using Arial Narrow, 12 point)
| EXAMPLE | |
| Pigment Name: | Rose Dore (Quin) |
| Brand: | (Da Vinci) |
| Pigment Number: | Mixed Pigment: PV19 + PR188 |
| Transparency: | Transparent |
| Granulation: | Medium Granulating |
| Staining Ability: | Staining |
| Lightfastness: | Very Good II |
- Pigment numbers can be either “Single Pigment” or “Mixed Pigment”.
- Transparency can be “Transparent”, “Semi-Transparent”, “Semi-Opaque” or “Opaque”.
- Granulation can be “Non-Granulating”, “Medium Granulating” or “Granulating”.
- Staining ability can be “Non-Staining”, “Semi-Staining” or “Staining”.
- Lightfastness can be “Very Poor – V”, “Poor – IV”, “Fair – III”, “Very Good – II” or “Excellent – I” (Try to stick to I & II if you can but one or two fugitive=not lightfast colors aren’t a terrible thing. More on that here)
 How To Make Swatch Cards
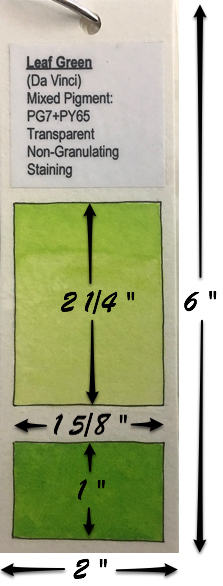
What I do is cut watercolor paper down to bookmark sized pieces that all measure 2″ x 6″. Hahnemühle Britannia Quattro 12″x12″ paper is perfect for this project! You want to use a good watercolor paper to allow your paints to show their true colors.
Print the pigment information using Arial Narrow, 12 point to fit in the space. Cut it all out and glue it onto the watercolor paper using a glue stick. To get all the painted squares the same size, I cut out one piece of watercolor paper that’s 3 5/8″ long and 1 5/8″ wide. Mark the extra lines on it so you know where the break in between the graded wash and the mass tone on the bottom. Your template should look like this:

Then all you have to do is put it over each blank bookmark, use a pencil to trace around it and mark where the lines in the center go. I then use a 0.3 Zebra technical pen (or Micron or Staedtler) to outline the boxes. Now you’re ready to paint.
To make the gradation easier to do, I use a waterbrush. Make a strong but juicy wash. Start at the top and go back and forth, don’t re-dip the waterbrush in color, just work your way down the larger box. Try also not to go back up as it’ll cause a backwash. For the smaller box at the bottom, make a very strong mix, with just enough water for the paint to flow and fill the box in fully. You may want to use a real brush for this so you don’t inadvertently add more water with the water brush. This is called your mass tone color, the darkest the color will be.
Marking For Opacity
Some artists also put a black waterproof line down the longer box (Use a Zebra, Micron or Staedtler 08). Then paint over it, this would show transparency. I don’t do it because I just don’t have opaque colors, the exception being my cobalt turquoise and Payne’s grey bluish. But then, those I know are semi-opaque. If you do have some semi-opaque or opaque colors you might want to add that waterproof line to show yourself visually just how opaque your watercolor is as it gradates down to a thin wash.
I laminate my swatch cards! This keeps them safe forever. I never have to worry about them getting dirty or water drops/spills reactivating the paint. They also look SO professional all laminated up. I used these bookmark laminating sheets. A laminator is so inexpensive these days and you’d be shocked how many times a year you use it. Laminate all your recipes, todo lists (make them checklists you can wipe off!) and of course your swatches.
It’s A Love Thing
Making swatch cards takes some time. Make it a project of love. Because you’ll LOVE these when they’re done! I’ve had several artists ogle my swatch cards. They look that enticing. I hang them on my bookcase as art!Fully complete pigment information can be arduous to compile. It is almost never in the same place. Sometimes you’ll find yourself going to half a dozen places online to collate everything! This is the biggest reason, beyond having a swatch of each color, that I do my swatch cards. I hate looking up the info in multiple places, it’s frustrating! I hope the above content is helpful. If it is, please click the link below to support me.
Support Me & This Site
Go Here and read about buying me a Ko-Fi (pronounced Coffee!). I’m asking for my reader’s help. There are no user fees, anything you donate is greatly appreciated! Thank you for your support.
___________________________________________
2018 Custom Schmicke Palette Is Selling QUICKLY!
More than 300 of this custom Schmincke Palette have sold! If you’d like to purchase it, just click on the pretty tin below. Learn all about the colors inside here. Also, I will be making a PDF to help corral all this information into one place. The PDF will include how to mix colors, transparency, granulation, staining, pigment info, choosing paper, and many, many more things. It will be on sale on here sometime in the next few weeks so watch this space!


OK, I thought *I* was OCD (especially when the watercolor teacher was showing something and I started to get anxious because she was making my palette look messy – (I have a “thing” about not having a messy palette)…..
I have lovely swatch cards in baseball card pages, all organized based on the extended color wheel at handprint (green yellow, yellow, yellow orange, orange yellow orange…..etc.) but I don’t TYPE all the hue information!!! (I use a Pigma pen) Holy batman, that’s a whole new level 🙂